React Native Guide
This guide explains how to create a new React Native app on Android and use the Abrevva React Native plugin to scan for EVVA components.
Prerequisites
Section titled “Prerequisites”- Install or update Android Studio to its latest version.
- Install or update Node.js to its latest version.
- Set up a bluetooth capable physical device to run your app.
Create example app
Section titled “Create example app”Use the expo bootstrapper to setup a new React Native app and install developer tools.
$ npx create-expo-app@latest && cd my-app$ npx expo install expo-dev-clientNow run the following command to create the android native code directory and run the app.
npx expo run:androidIn case you get gradle build errors you might need to exclude the META-INF files in the app’s build gradle file.
Show code
packagingOptions { ... resources.excludes.add("META-INF/*")}You should now see the example app.
Add dependency
Section titled “Add dependency”Execute the following commands to add the Abrevva React Native plugin to the package.json.
$ npx expo install @evva/abrevva-react-nativeSet permissions
Section titled “Set permissions”Open the AndroidManifest.xml and add the required permissions and features at the manifest level.
<uses-permission android:maxSdkVersion="30" android:name="android.permission.ACCESS_COARSE_LOCATION" /><uses-permission android:maxSdkVersion="30" android:name="android.permission.ACCESS_FINE_LOCATION" /><uses-permission android:maxSdkVersion="30" android:name="android.permission.BLUETOOTH" /><uses-permission android:maxSdkVersion="30" android:name="android.permission.BLUETOOTH_ADMIN" /><uses-permission android:name="android.permission.BLUETOOTH_SCAN" android:usesPermissionFlags="neverForLocation" tools:targetApi="s" /><uses-feature android:name="android.hardware.bluetooth_le" android:required="true" />Create scan page
Section titled “Create scan page”Inside app/(tabs)/ create a new file scan.tsx.
Show code
import {StyleSheet, Button, View} from 'react-native';
import ParallaxScrollView from '@/components/ParallaxScrollView';import { ThemedText } from '@/components/ThemedText';import { ThemedView } from '@/components/ThemedView';import { IconSymbol } from '@/components/ui/IconSymbol';import { AbrevvaBle, BleDevice } from "@evva/abrevva-react-native";import { SafeAreaProvider } from "react-native-safe-area-context";import { useState } from "react";
type ItemProps = {mac: string};
const Item = ({mac}: ItemProps) => (  <ThemedView style={styles.item}>    <ThemedText style={styles.itemTitle}>{mac}</ThemedText>  </ThemedView>);
export default function TabThreeScreen() {  const [devices, setDevices] = useState<BleDevice[]>([]);  const [scanLabel, setScanLabel] = useState<string>("Start Scan");  const [isScanning, setIsScanning] = useState<boolean>(false);
  let addDevice = (device: BleDevice) => {    if (!devices.map(e => e.deviceId).includes(device.deviceId)) {      devices.push(device);    }    setDevices([...devices, device]);  }
  let onPressScanButton = async () => {    await AbrevvaBle.initialize();    await AbrevvaBle.startScan((device) => {      addDevice(device);    }, () => {      setIsScanning(true);      setScanLabel("Scanning ...");      setDevices([]);    }, () => {      setIsScanning(false);      setScanLabel("Start Scan");    }, undefined, false);  }
  return (    <SafeAreaProvider>      <ParallaxScrollView        headerBackgroundColor={{ light: '#D0D0D0', dark: '#353636' }}        headerImage={          <IconSymbol            size={310}            color="#808080"            name="wifi"            style={styles.headerImage}          />        }>        <ThemedView style={styles.titleContainer}>          <ThemedText style={{textAlign: 'left'}} type="title">Scan</ThemedText>          <Button            onPress={onPressScanButton}            title={scanLabel}            color="#841584"            accessibilityLabel="Scan Button"            disabled={isScanning}          />        </ThemedView>        <ThemedText>Here a list of found EVVA components will be shown.</ThemedText>        {devices.map((item, index) => (          <View key={index}>            <Item mac={item.advertisementData?.manufacturerData?.identifier || "unknown"} />          </View>        ))}      </ParallaxScrollView>    </SafeAreaProvider>  );}
const styles = StyleSheet.create({  headerImage: {    color: '#808080',    bottom: -90,    left: -35,    position: 'absolute',  },  titleContainer: {    flexDirection: 'row',    gap: 8,  },  item: {    backgroundColor: '#f9c2ff',    padding: 8,    marginVertical: 6,    marginHorizontal: 0,  },  itemTitle: {    fontSize: 20,  },});
Add the new page to the tab bar navigation inside app/(tabs)/_layout.tsx.
Show code
<Tabs.Screen name="scan" options={{ title: 'Scan', tabBarIcon: ({ color }) => <IconSymbol size={28} name="wifi" color={color} />, }}/>For the icon to appear add an Android Material mapping to the iOS SF Symbols wifi icon inside components/ui/IconSymbol.tsx.
Show code
// Add your SFSymbol to MaterialIcons mappings here.const MAPPING = { // See MaterialIcons here: https://icons.expo.fyi // See SF Symbols in the SF Symbols app on Mac. 'house.fill': 'home', 'paperplane.fill': 'send', 'wifi': 'wifi',}Final result
Section titled “Final result”Upon pressing the Start Scan button you should see bluetooth results flying in.
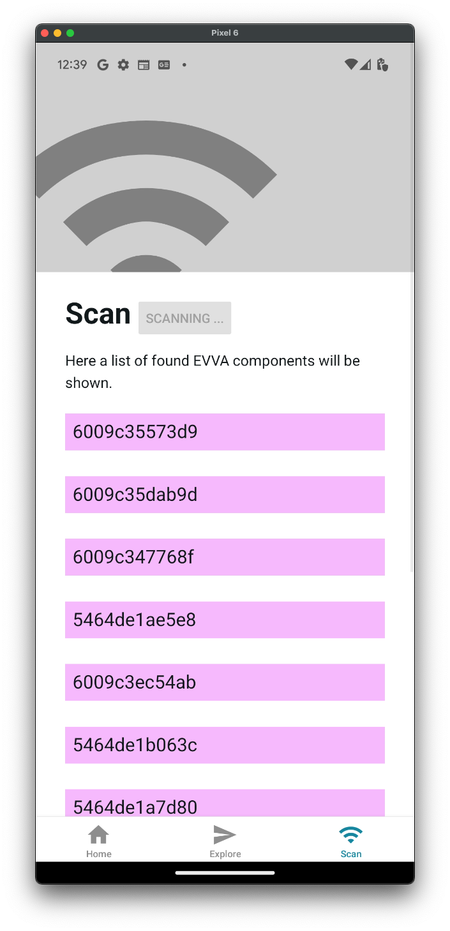
You can find the full example code on Github.